Maintaining your own mushroom culture library is a time-saving and rewarding experience. It takes some time to get the hang of it, but there are methods that you can use without too much equipment. The main piece of equipment that you’ll need is a pressure cooker.
In general, people use two mediums for storing their cultures: agar or liquid cultures. In the mushroom community, liquid cultures generally have a bad rap since it’s harder to detect when they have contamination. However, using some simple steps you can ensure your liquid cultures remain contaminant free, even when you’re not working in a sterile environment.
Working with Liquid Cultures
What you need:
- a pressure cooker that can reach 15PSI
- jars with an airport lid
- syringe and needle (preferably 16+ gauge)
- alcohol wipes or alcohol spray
- lighter
- gloves
The easiest way to create your own liquid cultures is by starting with a clean culture from a reputable supplier and then expanding it into more liquid culture. The steps involved are:
- Add liquid culture recipe to your airport jars, typically consisting of tap water plus some sugar/nutrients
- Pressure cook the airport jars to sterilise the liquid culture
- Add a small amount of master culture to sterilised liquid culture
- Wait until the culture grows out, then use it to inoculate grain spawn or your fruiting substrate
Adding liquid culture to airport jars
This step is very simple, the only part that takes a bit of trial and error is working out which recipe works best for the mushroom that you’re trying to grow. For oyster mushrooms and shiitake, a simple recipe is tap water + maple syrup. Simply add 1 tsp of pure maple syrup to 1 cup of hot water, give it a mix and add it to your jars with airport lids screwed on. I try to fill my liquid culture jars fairly close to the top, leaving about 5cms (2 inches) of air. This will make it easier to draw liquid out with a syringe and it also allows for some evaporation. It’s also a good idea to add something to your jars to break up the mycelium. Professionals use a stir bar and put their culture on a magnetic stir plate, but you can add some marbles or broken glass to the jar. Adding this will help your break apart large clumps of mycelium in order to help your culture grow faster and prevent it clogging the needle when you suck it into a syringe.
It’s a good idea to cover the top of your jars with aluminium foil before pressure cooking them. This stops the filter from getting too wet and also means that the jars are protected from exposure to contaminants until you’re ready to remove the alfoil.
Pressure cook the liquid culture
Add the jars to your pressure cooker and bring them to 15 PSI for approximately 15-20 minutes. Read the instructions on your pressure cooker and always remember to fill it above the base plate with water.
Leave the culture to cool to room temperature, it will probably take several hours for this to happen, I usually let it cool overnight.
Add some mother culture to the liquid culture
Once you’ve let your jars cool, get your master culture, alcohol wipes and lighter ready. Shake your master culture vigorously to break up the mycelium as much as possible. If it’s the first time that you’re using the syringe needle, you won’t need a lighter since the needle will be sterile. Take the alfoil off the top of your first jar and push the needle through the self-healing injection port and pump a small amount of liquid culture (1-2 mLs) in the jar. Repeat this with all of the jars that have been pressure cooked.
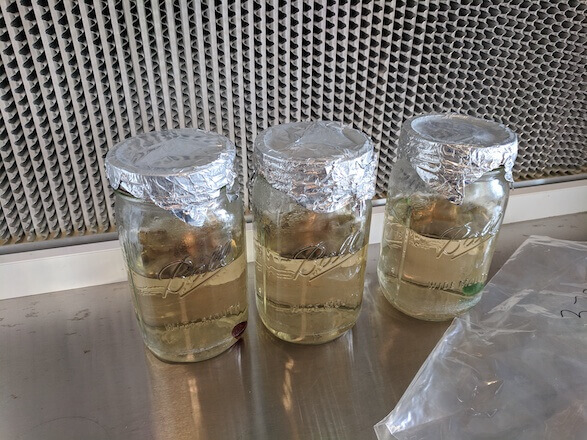
Liquid culture has been pressure cooked, aluminium foil on top to keep sterile.
If you’re not using alfoil, it’s a good idea to wipe the injection port with an alcohol swab prior to sticking a needle through it. Alternatively you can spray it with your alcohol spray (70% alcohol/methylated spirits, 30% water).
If you’re reusing a needle for your syringe, you’ll need to sterilise the needle prior to use. Simply connect the needle to the syringe and hold the syringe over a flame moving it back and forth until the needle is red hot. You can then squirt a small amount of culture out of the needle to cool it down, or rub the needle with an alcohol wipe.
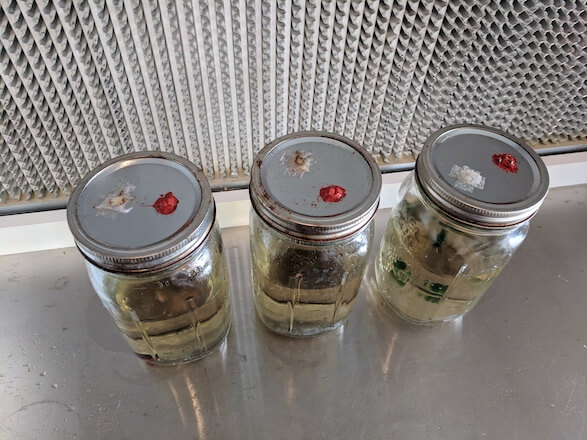
Airport lids ready for innoculation with liquid culture
Adding agar to liquid culture
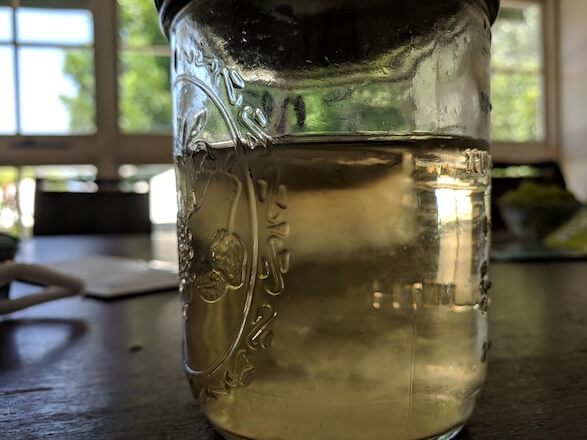
A wedge of agar floating on top of liquid culture. The mycelium is growing into the liquid.
Put it on shelf at wait for it to grow
The majority of mushrooms grow best at a temperature around 25C, outside of this they’ll grow a little slower. I usually leave my jars on a shelf indoors for the first 4-5 days without disturbing it while the mycelium enters growth mode. You should see the mycelium slowly start to grow as it consumes the sugar. After this resting period, swirl the culture every few days to introduce oxygen into the liquid and to break up the mycelium.
Once the mycelium is taking up a large amount of the volume of the jar, vigorously agitate the liquid culture so that the mycelium is as broken up as possible, tilt the jar so that the liquid culture comes up against injection port and, with a sterile syringe and needle, suck the liquid culture into the syringe until it’s full. Your syringe is now ready to inject into grain jars, transfer to agar or share with friends.
Working with agar cultures
What you need:
- a pressure cooker that can reach 15 PSI
- agar agar
- some nutrients for the agar
- a jar/plastic takeaway container or petri dishes
- a scalpel or dentist pick
Agar is a jellylike substance that’s derived from seaweed, the Malay word for jelly is agar-agar, so you’ll see it called agar or agar-agar. You can either buy powdered agar by itself or with added nutrients and potentially antibiotics. If you’re just starting out, the cheapest place to buy agar is from your local Chinese supermarket or you can buy a little packet for a few dollars from eBay. If you buy it from someone who sells mushroom supplies, you’re likely to buy it premixed with some nutrients MEA (Malt-extract agar) or PDA (potato-extract agar). If you want to make your own, it’s easy enough to buy malt extract separately and mix it with agar. Places like Fungi Perfecti sell premixed agar with antibiotics. Antibiotics are useful because they will limit the number of bacterial contaminations you get. This type of agar is easy to use, but will cost more than if you make it yourself. If you don’t want to use antibiotics but want to limit the number of bacterial issues you get, you can mix in a small amount of hydrogen peroxide (bought from your local chemist) when your agar cools below 50C.
Containers
You can use agar in all kinds of containers as long as it’s sealable and is either sterile, or able to withstand the temperatures of a pressure cooker. The most common vessels are petri dishes, but if you’re going low tech you can re-use little plastic takeaway containers (made of polypropylene) or small glass jars. If you’re looking to store mushrooms longer term, you can create slants in test tubes.
Mixing and Sterilising
To add the agar mixture to your container, you’ll need to mix some boiling water with agar powder. The ratio of agar to water you use will determine its consistency. Paul Stamets recommends using 25g of agar per 500ml of water (about 5%), but you can get away with less.
In general, I’ll make my agar in a single vessel and then pour it into petri dishes after pressure cooking it. If you’re using jars, you can mix the agar and then pour it into the jars before putting it in the pressure cooker. The cheapest vessel to use for your agar is an old beer bottle. Mix the agar and hot water, pour it into the beer bottle with a funnel and then cover the top of the bottle with some aluminium foil and pressure cook it for 15-20 minutes at 15 PSI. If you’re pouring into petri dishes, the easiest vessel to pour from is a polypropylene jug. You fill the jug with your agar mix, cover it with aluminium foil and then pressure cook it. If you’re using a metal scalpel to do your culture transfers, it’s a good idea to wrap it in alfoil and put it in the pressure cooker along with the jug to sterilise it.
Pouring
After your agar is pressure cooked, you’ll need to pour it while it’s still hot, otherwise it will set in your jug. However, if you try and pour it while it’s too hot you’re more likely to burn yourself, and you petri dishes will get a lot more condensation on them. I usually wait an hour after I turn the heat off my pressure cooker before opening it up and pouring the agar into plates.
If you’re pouring petri dishes, you’ll need to do this in an aseptic (sterile) environment. This means using a still air box, or glove box if you’re just starting out. If you get into the hobby a bit more seriously, buying or constructing a flow hood to work in front of makes life much easier.
Inoculating
You’ll need to inoculate your agar in a sterile environment (still air box/flow hood). The exception to this is if you’re transferring from liquid culture into jars with airport lids, as the agar won’t be exposed to the air at all.
From liquid culture
To transfer liquid culture to agar, you’ll be using a syringe. You’ll liquid culture will either already be in a syringe, or it will be in a jar that you’ll first need to pull into a syringe. Either way, you’ll need to agitate your liquid culture to break it up, so that each drop of liquid contains a little mycelium. From the syringe, squirt a few drops of the liquid culture onto the agar, you don’t need very much. If your agar culture has airport lids, you can do this in a non-sterile environment.
From agar
Ensure you have a sterile syringe or a dental pick. Cut a small wedge of the colonised agar and quickly transfer it to fresh agar and then seal up the container. If you’re using petri dishes, it’s a good idea to either put them in zip lock bags or to wrap parafilm around them to stop them from drying out and being exposed to contaminants.
From a mushroom
Creating an agar culture by cloning a fresh mushroom is fairly straightforward, and it is easier if the mushroom that you’re cloning is big. Dip your mushroom into a weak H202 (hydrogen peroxide) solution for a few seconds, or spray it liberally with a water/methylated spirits mixture. With gloves on, split the mushroom in half using your hands to expose tissue at centre of the mushroom. Cut a very small part of this tissue out from this central area using your scalpel or a dental pick and transfer it to your agar. You want to get a bit of tissue that has not been exposed to air, as this will significantly reduce the chance of transferring contaminants across. A few days after transfer, you should see visible signs of growth.
From spores
When transferring spores to agar, you will need to use an inoculation loop. You can buy them fairly cheaply online, or you can make one yourself out of some wire. From your spore print, gently scrape your inoculation loop over the top of your spores and then with the loop you’re going drag it in an S shape onto the agar (this is called streaking). Where you begin the streak (at the top of the S) should have the most spores, and the bottom will have the least. Within a few days to a week, you should see mycelium slowly start to grow in the shape of an S. It’s a good idea to do several plates at once in case some fail.
After your spores germinate, you can either transfer the agar directly to grain spawn (multi-spore culture), or cut off strong looking sectors of mycelium to transfer to fresh agar plates. Doing this allows you to isolate a single strain. As a home cultivator, if you’re looking to produce your own strain, it’s easiest to start with multi-spore spawn, fruit the culture and then clone the best looking mushrooms. The mushrooms that you end up cloning are likely to be vigorous as they’ve outcompeted the other strains.